While roof replacement is often the best solution for many homeowners, this can be a messy, time-consuming and expensive project. Fortunately, most issues impacting a home’s roof can be repaired rather than replaced.
As any roof repair professional will tell you, the first step is to find the problem. Look for dripping water, water stains or pooled water and trace the damage back to its source. Contact Roof Repair Sacramento for professional help.
A roof’s shingles take a lot of abuse. Severe storms, wind, hail, snow, prolonged sun exposure, and age can all damage your shingles. If left unchecked, damaged shingles can lead to leaks and even more costly repairs.
Luckily, most shingle damage is fairly easy to repair. First, inspect the damage. If the shingle is only cracked, then you can simply apply some roofing cement to the crack and it will be good as new. If the shingle is missing, then you will need to replace it.
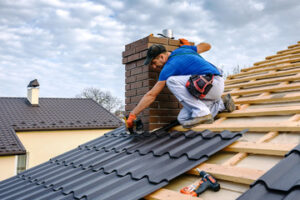
You will need to climb up on the roof, so make sure your ladder is secure and you have someone at the base to help out. Next, grab a hammer, a flat pry bar, and a utility knife. Slide the flat pry bar under the shingle directly above the damaged one, and gently lift it to expose the nail strip beneath. Next, pry upwards to pull up the shingle and its nails.
Repeat the process on the shingle below it, and then on each subsequent shingle until you have removed all the damaged shingles from the roof. You will then need to cut a replacement shingle to size, using your tinsnips. Lastly, insert the new shingle into its place and secure it with at least four roofing nails. If the damaged shingle had any nails that were not covered by the shingles above it, then you will need to re-nail these with the same method.
After you have replaced all of the shingles that need replacing, you should check for any additional problems such as leaks or stains. If you notice any other issues, then you can either re-nail them or use the roofing tar that was applied earlier to seal these spots. You will also need to do a general roof cleaning, making sure that all of the debris from your work is removed and the area is clean. This will help to prevent any future moisture damage. Also, make sure that you do a test run of the gutters to see if any colored granules from your shingles have washed into them.
Leaking Gutters
A leaking gutter can lead to a host of problems, from roof damage to basement flooding. It can also cause erosion to landscaping and, if it’s not directed properly, may even infiltrate the foundation of the home. A leaking gutter is a sure sign that it’s time for an inspection and repair.
Gutter leaks are a common problem caused by normal wear and tear, storm damage, or simply aging. They can be caused by holes or cracks, and over time these seemingly insignificant openings will enlarge, leading to serious water damage.
In some cases, a hole in a gutter can be fixed by filling it with plastic roofing cement. However, the best way to prevent gutter leaks is through regular cleaning and inspections.
Gutter aprons are a simple solution to this issue. These L-shaped lengths of metal flashing, available at most home improvement centers for less than $10 per section, are installed underneath the shingles and angle down over the inside edge of the gutter. This eliminates the gap between the gutter and the walls, channeling rainwater directly into the gutter.
Leaking gutters can also indicate that the gutter slope is off. This can be spotted easily by getting on a ladder after a rainstorm and examining the gutters from top to bottom. The gutters should slope toward the downspouts with at least a quarter inch of slope for every ten feet.
Another easy fix for this problem is to caulk the joints in the gutters. Silicone caulk is a great choice for this job because it’s flexible, durable, and resistant to the elements. The best time to apply the caulk is on a warm day after the gutters have been thoroughly cleaned and dry.
Finally, it’s important to inspect the downspouts regularly to ensure that they’re free of obstructions and that they’re directing rainwater away from the house. Sometimes, these downspouts can get clogged with leaves or twigs, and they may need to be cleaned. If a downspout isn’t directing rainwater away from the home, it might be necessary to change the landscaping or to install a new downspout.
Damaged Flashing
A roof’s flashing is an integral part of a waterproof seal. Without it or with damaged flashing, water can seep through unprotected crevices and cause a host of problems inside a home. In some cases, untreated water damage may result in a ceiling collapse or structural damage to the joists and framing of a building. In others, undetected water leaks may encourage mold growth or rot and contribute to higher energy bills.
Flashing is made of strips of metal or other material designed to cover and protect vulnerable areas of a roof, such as the seams where two sloped roof planes meet or the base of chimneys. It’s a common problem for flashing to become damaged or worn, which can allow moisture to penetrate the roofing structure. Fortunately, flashing is easy to repair with the help of a professional roofing contractor.
The first step is identifying and assessing the area of the roof where the flashing is damaged or missing. A visual inspection is usually enough to identify the problem areas. You should look for signs of rust, cracks, gaps, or loose sections. If you do find a section of flashing that’s damaged, it’s important to replace it with a new piece that’s the same size and shape as the existing section. You should also add a layer of protective roofing membrane to ensure the new flashing doesn’t become compromised or fail within a short period of time.
Depending on the severity of the damage, you might be able to make minor repairs with flashing tape. This type of flexible and durable material covers up small holes and gaps and creates a temporary fix until you can call a roofing repair expert to come out and perform more extensive repairs.
If you notice a hole in your roof’s flashing, it’s crucial to contact a roofing expert immediately. Often, a roofing specialist will need to remove the shingles surrounding the hole and then install a patch of flashing that’s slightly larger than the original section and secure it with roofing cement or roof sealant.
Damaged Substrate
The building substrate is a structural component of the building and plays a major role in protecting it against damage. Whether the substrate is wood, concrete, EIFS or some other material, it must be maintained and repaired when damaged to keep the building safe. Compromised substrates can lead to serious safety issues like falling buildings or collapsed walkways.
A common cause of damage to the substrate is moisture intrusion. This can be caused by gaps, cracks, or improperly sealed penetrations. If not addressed quickly, moisture can deteriorate the substrate and lead to structural problems. This is a critical reason for proper moisture management and inspections.
Other common causes of substrate damage include aging, improper installation, and settlement. The age of the substrate can affect its ability to resist moisture and can also increase the rate at which it degrades. Poor installation can result in structural problems or the failure of coatings to adhere properly to the substrate. Stucco can be particularly prone to moisture problems, especially when the substrate is not properly prepared or if it is not installed by experienced professionals. Settlement can lead to stress on the stucco and cracks in the substrate, which can be costly if not addressed promptly.
Depending on the type of substrate and the cause of damage, there are several ways to repair it. In some cases, it may be as simple as sanding and patching the substrate. Other times, it may require more extensive repairs or replacement. For example, if the substrate is asphalt, it may need to be replaced entirely.
For concrete, the first step is to remove all loose and broken materials and roughen the surface. It is then resurfaced with an appropriate material and allowed to cure. Once it is ready, a high-early-strength patching mortar can be used to repair the damage.
The key to repairing these more difficult substrates is to understand the problem and the proper repair process for that material. Manufacturers provide repair procedures that help you do this. These procedures can vary widely from one product to another, so it is important to know what you are doing before you start.